지난번 젠킨스에 이어, 이번엔 github action을 활용해 CI/CD를 구축해보자.
먼저 CI (Continuous Integration) 환경을 구축하는 법을 알아보자.
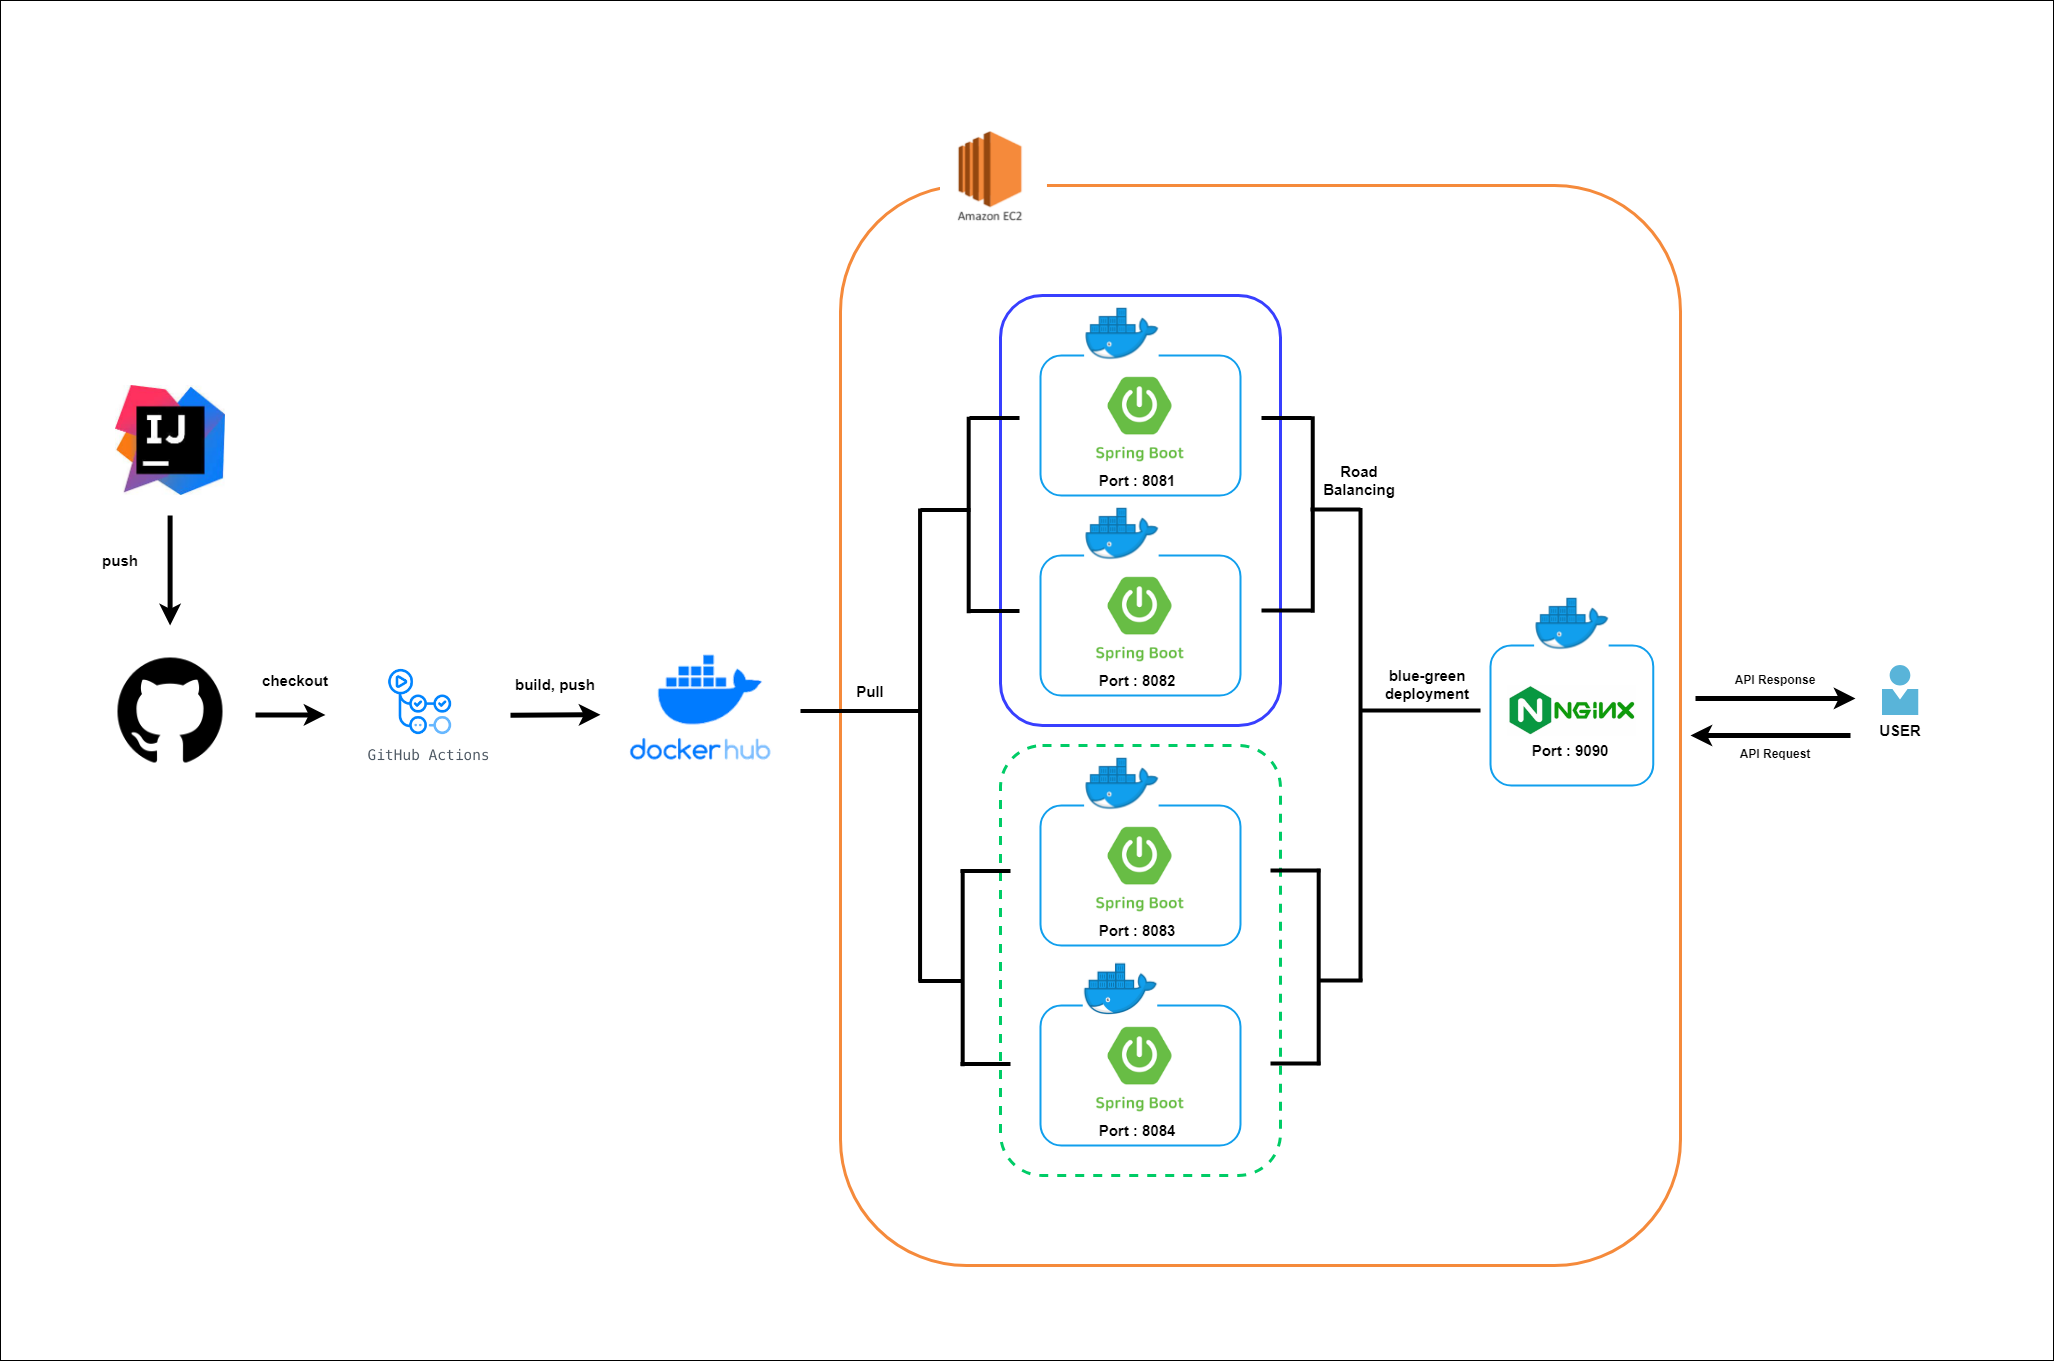
구축하고자 하는 최종 아키텍쳐는 다음과 같다.
CI/CD 학습용이기 때문에 EC2 하나로 구현을 시도하였다.
그러나 추후 여러 문제로 인해 green group을 위한 ec2 서버를 추가하였다. (무중단 배포 불가능한 이슈)

1. github action 시작하기
github 프로젝트 ➡️ actions에서 workflow를 하나 작성해준다.
기본 workflow를 다음과 같이 수정해준다.
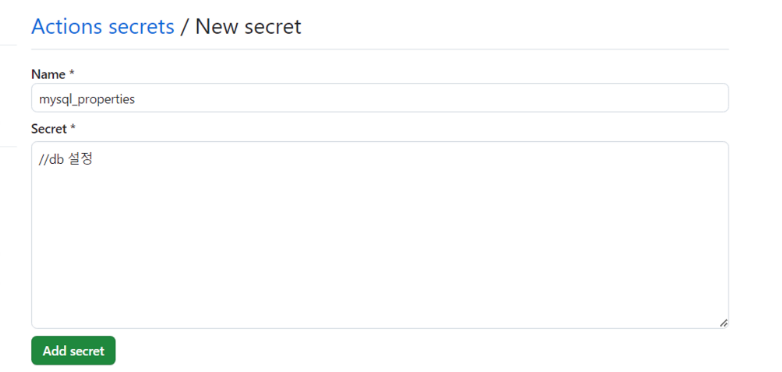
필자는 프로젝트에서 mysql 설정을 [application-mysql.properties](http://application-mysql.properties) 에 적고, 해당 파일을 gitignore 처리 했기 때문에 CI 과정에서 해당 파일을 만들고 내용을 적어준다.
그리고 해당 내용은 github secret에 등록해서 은닉해준다.
      <code />


      name: nsfServer Github Action

on:
  push:
    branches: [ main ]
  pull_request:
    branches: [ main ]

permissions: write-all

jobs:
  test:
    runs-on: ubuntu-latest

    steps:
      - uses: actions/checkout@v3

      - name: Set up JDK 17
        uses: actions/setup-java@v3
        with:
          java-version: '17'
          distribution: 'temurin'

      - name: make application-database.yml
        run: |
          cd ./src/main/resources

          # application-database.yml 파일 생성
          touch ./application-mysql.properties

          # GitHub-Actions 에서 설정한 값을 application-mysql.properties 파일에 쓰기
          echo "${{ secrets.MYSQL_PROPERTIES }}" >> ./application-mysql.properties
        shell: bash


      - name: Grant execute permission for gradlew
        run: chmod +x gradlew

      - name: Build and Test with Gradle
        run : ./gradlew clean build
2. github secret에 Mysql 정보 은닉
자동배포중 민감한 정보들 (aws password , ip 정보 등) 은 github에 올릴 수 없으니 은닉해야한다.
이때 github에서는 github secret을 통해 이를 지원한다.
github 내 프로젝트 ➡️ settings ➡️ secrets and variables ➡️ Actions 로 이동한다.
Repository secrets에서 New repository secret을 클릭하고, mysql.properties의 내용을 옮기고 저장해준다.

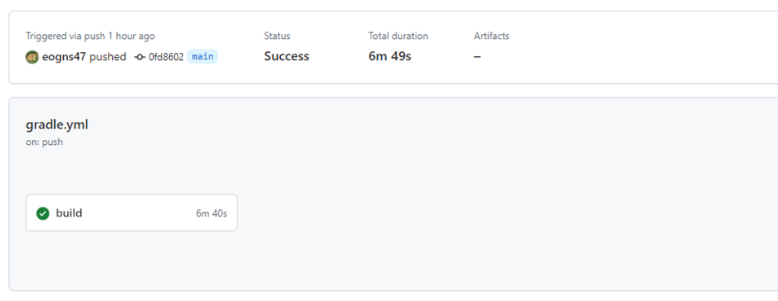
실행 후 초록불이 뜨면 성공!
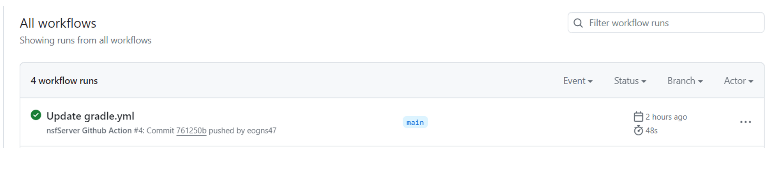
이제 CI는 테스트가 완료됐다.
자동 배포만 해결하면 되는데, 빌드된 파일을 서버에 배포하기 위해서는 SCP를 사용해야 한다.
그러나 자동 배포에 SCP라니 좀 불편한 감이 있다.
환경 설정 , 의존 파일 등등 ..
따라서 빌드과정에서 테스트만을 남기고, docker 파일을 빌드해서 배포하는 방식으로 변경해보자.
3. docker, dockerhub 연동 추가
      <code />


      name: nsfServer Github Action

on:
  push:
    branches: [ main ]
  pull_request:
    branches: [ main ]

permissions: write-all

jobs:
  # jobs는 build, deploy 2개가 있습니다.
  # jobs는 다른 러너(환경)에서 구동됩니다.
  # step는 같은 러너에서 구동됩니다.
  build:
    runs-on: ubuntu-latest

    steps:
      - uses: actions/checkout@v3
      - name: Set up JDK 17
        uses: actions/setup-java@v3
        with:
          java-version: '17'
          distribution: 'temurin'

      - name: make application-database.yml
        run: |
          cd ./src/main/resources

          # application-database.yml 파일 생성
          touch ./application-mysql.properties

          # GitHub-Actions 에서 설정한 값을 application-mysql.properties 파일에 쓰기
          echo "${{ secrets.MYSQL_PROPERTIES }}" >> ./application-mysql.properties
        shell: bash


      - name: Grant execute permission for gradlew
        run: chmod +x gradlew

      - name: Build and Test with Gradle
        run : ./gradlew clean build

      - name: Login to DockerHub
        uses: docker/login-action@v1
        with:
          username: ${{ secrets.DOCKERHUB_USERNAME }}
          password: ${{ secrets.DOCKERHUB_TOKEN }}

      - name: Install docker buildx
        uses: docker/setup-buildx-action@v1
    # 도커 빌드
      - name: Build Docker Image
        run: |
          docker buildx create --use
          docker buildx inspect
          docker buildx build --platform linux/arm64/v8,linux/amd64 -t ${{ secrets.DOCKERHUB_USERNAME }}/nsfserver:v2 --push .
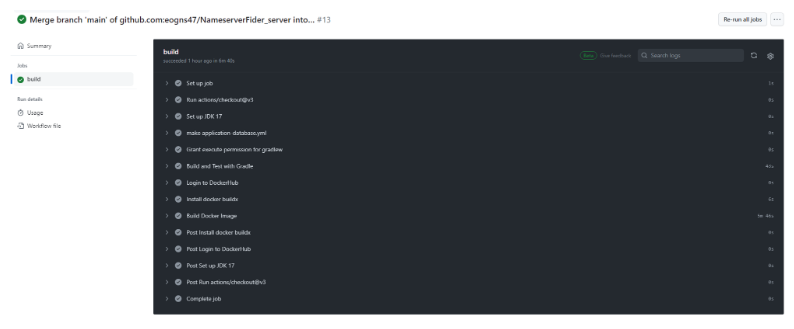
yml 파일을 수정한 뒤, 로컬에서 작업한 내용을 push 해보았다.
main 브랜치의 병합을 감지하고 빌드와 dockerhub 푸시를 정상적으로 성공한 모습을 볼 수 있다.
4. 검증
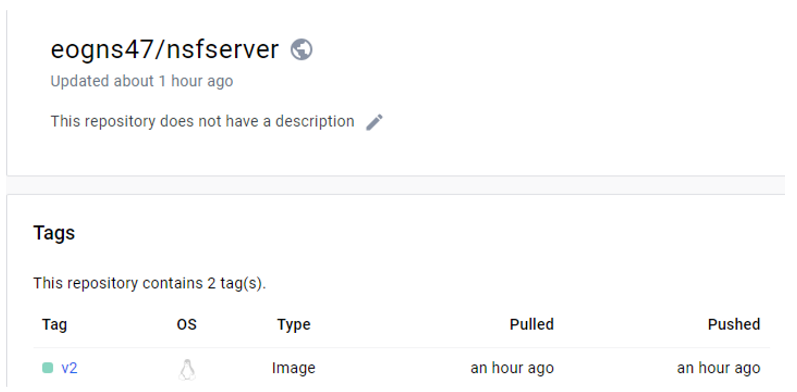
dockerhub에도 정상적으로 올라간 모습을 볼 수 있다..
기존 이미지를 삭제하고, 깃허브 액션으로 build&push 된 이미지를 직접 다운 받아 컨테이너를 실행해봐도 문제 없이 잘 되는 모습이다.
      <code />


      $ docker pull eogns47/nsfserver:v2                                                                                          ok
v2: Pulling from eogns47/nsfserver
38a980f2cc8a: Already exists
de849f1cfbe6: Already exists
a7203ca35e75: Already exists
c18cb75ada2e: Pull complete
Digest: sha256:fbe2daa2029ee90d4a52266fb0e94123a8ed0333244f5388694c962800535e8e
Status: Downloaded newer image for eogns47/nsfserver:v2
docker.io/eogns47/nsfserver:v2

$ docker-compose up -d                                                                                                      ok
[+] Running 6/6
 ✔ tserver2 Pulled                                                                                                                                                                     7.3s
 ✔ tserver1 4 layers [⣿⣿⣿⣿]      0B/0B      Pulled                                                                                                                                     7.3s
   ✔ 38a980f2cc8a Already exists                                                                                                                                                       0.0s
   ✔ de849f1cfbe6 Already exists                                                                                                                                                       0.0s
   ✔ a7203ca35e75 Already exists                                                                                                                                                       0.0s
   ✔ f8dbca18bf11 Pull complete                                                                                                                                                        3.0s
[+] Running 3/3
 ✔ Container nsfserver-nginx-1  Started                                                                                                                                                1.8s
 ✔ Container tserver1           Started                                                                                                                                                1.7s
                           1.7s
다음 포스팅에서는 CD를 진행해보자.
reference
'♾️DevOps > ♾️CI & CD' 카테고리의 다른 글
| [CI/CD] - 무중단 배포 withCI/CD 3: github action을 활용한 CD 편 (1) | 2024.02.26 |
|---|---|
| [CI/CD] - 무중단 배포 with CI/CD 1: nginx + spring 로드 밸런싱 편 (0) | 2024.02.26 |
| [CI/CD] - 도커와 젠킨스를 사용한 CI/CD -4 (도커의 설치부터 자동배포까지) (5) | 2024.01.09 |
| [Trouble Shooting] - 젠킨스 빌드 시 error: external filter 'git-lfs filter-process' failed 에러 해결하기 (1) | 2023.12.30 |
| [CI/CD] - 도커와 젠킨스를 사용한 CI/CD -3 (도커의 설치부터 자동배포까지) (0) | 2023.10.22 |