엘라스틱서치 노드 & 키바나 & 로그스태시 서버를 각각 구축했다면, 이제 각각의 yml 파일들을 수정해주어야 합니다.
최종 목표 아키텍쳐는 다음 그림처럼 각 서버당 도커 컨테이너를 띄우고, 세 개의 서버에서는 엘라스틱 서치를 , 한 개의 서버에서는 키바나를 띄우는 멀티 노드 클러스터를 구축하는 것입니다.

엘라스틱 서치와 키바나 설치 과정은 이전 포스팅을 참고해주세요.
[ELK] - Elasticsearch & Kibana 8.12.2 설치 (with docker,WSL2)
이번 포스팅에서는 엘라스틱 서치와 키바나 8.12.2 버전을 설치하고, 단일 노드와 멀티 노드 클러스터 환경을 각각 구축하는 방법에 대해 알아보겠습니다. 만약 서버(컴퓨팅 자원)이 여러 대라면
kangmanjoo.tistory.com
다만 도커 컨테이너를 올릴 때, 도커 내 브릿지를 새로 만들었던 기존 방식과 달리 --net host 명령어를 통해 네트워크를 호스트의 IP와 동일하게 맞춰줍니다.
docker run -d --name es01 --net host -p 9200:9200 -it -m 16GB docker.elastic.co/elasticsearch/elasticsearch:8.12.2
엘라스틱서치 설정 파일
먼저 엘라스틱 서치 컨테이너의 폴더 계층은 다음과 같습니다.
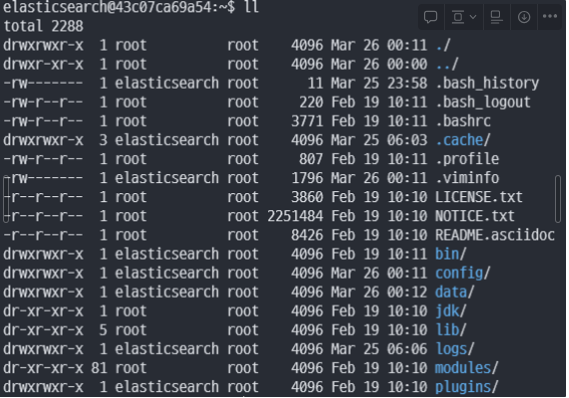
| 폴더명 | 역할 |
| bin | 자바 실행 변수 파일과 엘라스틱서치 실행 파일, 플러그인 설치 프로그램 |
| config | ES 실행 환경 설정 파일 |
| lib | 자바 라이브러리 파일이 모여 있는 디렉토리 |
| logs | 로그가 쌓이는 디렉토리 |
| modules | elasticsearch 의 기능에 도움을 주는 built-in module 이 모여 있는 디렉토리 |
| plugins | 커스텀 플러그인 |
그 중 수정해야할 파일들이 있는 config 폴더의 파일 계층은 다음과 같습니다.

| 파일명 | 역할 |
| jvm.options | elasticsearch 메모리 크기 설정 파일 |
| log4j2.properties | 로그 설정 파일 |
| roles.yml | 권한 설정 파일 |
| elasticsearch.yml | elasticsearch 설정 파일 |
첫번째 노드의 elasticsearch.yml 파일 수정
우선 elasticsearch.yml을 수정해줍니다.
해당 파일은 elasticsearch 컨테이너의 /config/elasticsearch.yml 에 위치합니다.
초기 코드는 다음과 같습니다.
cluster.name: "docker-cluster"
network.host: 0.0.0.0

#----------------------- BEGIN SECURITY AUTO CONFIGURATION -----------------------
#
# The following settings, TLS certificates, and keys have been automatically
# generated to configure Elasticsearch security features on 25-03-2024 06:03:48
#
# --------------------------------------------------------------------------------

# Enable security features
xpack.security.enabled: true

xpack.security.enrollment.enabled: true

# Enable encryption for HTTP API client connections, such as Kibana, Logstash, and Agents
xpack.security.http.ssl:
  enabled: true
  keystore.path: certs/http.p12

# Enable encryption and mutual authentication between cluster nodes
xpack.security.transport.ssl:
  enabled: true
  verification_mode: certificate
  keystore.path: certs/transport.p12
  truststore.path: certs/transport.p12
# Create a new cluster with the current node only
# Additional nodes can still join the cluster later
cluster.initial_master_nodes: ["43c07ca69a54"]

#----------------------- END SECURITY AUTO CONFIGURATION -------------------------
엘라스틱 서치는 환경변수가 , 로 분리되어 있으면, 파싱하여 리스트로 변환합니다.
즉, 만약 Hostname을 export HOSTNAME="host1,host2" 와 같이 설정하면 host1과 host2를 리스트로 반환합니다.
설정들을 하나씩 살펴보겠습니다.
cluster.name은 클러스터 이름으로, 같은 클러스터로 묶을 노드들은 전부 동일한 이름으로 수정해주어야 합니다.
network.host는 클러스터를 구축할 때 필요합니다. 단일 노드일 경우 127.0.0.1로 설정해주어도 되지만, 만약 클러스터를 구축한다면 site 혹은 global**로 변경해주어야 합니다. 현재 테스트용으로 같은 네트워크망에 있는 노드들과만 통신할 것이므로 _site_로 설정해줍니다.
(만약 network.host값을 변경하면 ES는 이를 감지하고 개발 모드에서 배포 모드로 변경합니다. 이는 더 많은 리소스를 소모하므로, 유의하고 설정해주어야 합니다. 자세한 차이점은 *링크**에 있습니다. )
node.name은 기본 설정값은 PC의 호스트명이므로, 새로 설정해주어야 합니다.
discovery.seed_hosts는 기존에는 클러스터 내에 있는 모든 IP를 입력해주었어야 했지만, enrollment토큰 개념이 생긴 이후로는 토큰에 있는 메타데이터 정보를 읽어 자동으로 파싱합니다.
최종 수정 파일은 다음과 같습니다.
cluster.name: "test-cluster"
network.host: "_site_"
node.name: "es01"

#----------------------- BEGIN SECURITY AUTO CONFIGURATION -----------------------
#
# The following settings, TLS certificates, and keys have been automatically
# generated to configure Elasticsearch security features on 26-03-2024 04:32:54
#
# --------------------------------------------------------------------------------

# Enable security features
xpack.security.enabled: true

xpack.security.enrollment.enabled: true

# Enable encryption for HTTP API client connections, such as Kibana, Logstash, and Agents
xpack.security.http.ssl:
  enabled: true
  keystore.path: certs/http.p12

# Enable encryption and mutual authentication between cluster nodes
xpack.security.transport.ssl:
  enabled: true
  verification_mode: certificate
  keystore.path: certs/transport.p12
  truststore.path: certs/transport.p12
# Create a new cluster with the current node only
# Additional nodes can still join the cluster later
discovery.seed_hosts: ["elastic-1"]
cluster.initial_master_nodes: ["es01"]

#----------------------- END SECURITY AUTO CONFIGURATION -------------------------
설정을 마치면, docker를 재실행해줍니다.
docker restart es01
SSL 인증서를 받아오고 curl을 통해 설정이 잘 바뀌었는지 확인합니다.
docker cp es01:/usr/share/elasticsearch/config/certs/http_ca.crt .
curl --cacert http_ca.crt -u elastic:$ELASTIC_PASSWORD https://localhost:9200
두번째 노드 설정
두번째 노드부터는 enrollment 토큰을 사용할 것이기 때문에 설정해줄것이 없습니다.
먼저 첫번째 노드에서 다음 명령어로 토큰을 발행받습니다.
docker exec -it es01 /usr/share/elasticsearch/bin/elasticsearch-create-enrollment-token -s node그리고 발행받은 토큰을 컨테이너 실행 옵션에 넣고 실행합니다.
docker run -d --name es02 -e ENROLLMENT_TOKEN="{발행받은 토큰}" --net host -p 9200:9200 -it -m 16GB docker.elastic.co/elasticsearch/elasticsearch:8.12.2
이제 실행된 컨테이너에 접속해 elasticsearch.yml 파일의 내용을 보면, 다음과 같이 discovery.seed_hosts에 처음 생성한 노드의 IP가 자동으로 들어가 있는 것을 확인할 수 있습니다.
cluster.name: "docker-cluster"
network.host: 0.0.0.0

#----------------------- BEGIN SECURITY AUTO CONFIGURATION -----------------------
#
# The following settings, TLS certificates, and keys have been automatically
# generated to configure Elasticsearch security features on 27-03-2024 08:16:47
#
# --------------------------------------------------------------------------------

# Enable security features
xpack.security.enabled: true

xpack.security.enrollment.enabled: true

# Enable encryption for HTTP API client connections, such as Kibana, Logstash, and Agents
xpack.security.http.ssl:
  enabled: true
  keystore.path: certs/http.p12

# Enable encryption and mutual authentication between cluster nodes
xpack.security.transport.ssl:
  enabled: true
  verification_mode: certificate
  keystore.path: certs/transport.p12
  truststore.path: certs/transport.p12
# Discover existing nodes in the cluster
discovery.seed_hosts: ["192.168.0.84:9300"]

#----------------------- END SECURITY AUTO CONFIGURATION -------------------------
node의 정보를 확인해보면 클러스터가 제대로 구축된 모습을 확인 가능합니다.
노드 이름도 도커 컨테이너 이름을 그대로 가져온 모습입니다.

물론 두번째 노드를 만든 서버의 IP로 조회를 해봐도 동일하게 나옵니다. SSL 인증서를 따로 발급받지 않아도 오류가 발생하지 않는 것을 보면, 토큰의 메타데이터를 통해 SSL 인증서 또한 공유하고 있는 것을 어렵지 않게 확인할 수 있습니다.

키바나 설정
키바나 또한 컨테이너의 /config/kibana.yml 위치의 kibana.yml파일 또한 기존에는 es 서버의 IP를 입력해주고 SSL 인증서의 경로를 등록하는 등의 작업이 필요했지만, 이제는 키바나를 실행하고 토큰을 입력해주면 해당 정보들을 자동으로 크롤링해옵니다.

server.host는 키바나에 접근 가능한 IP이고, 0.0.0.0으로 설정해 모든 IP에서 접근 가능하도록 합니다.
server.port는 키바나에 접근하는 포트입니다.
elasticsearch.hosts는 키바나가 관리할 노드의 ip입니다.
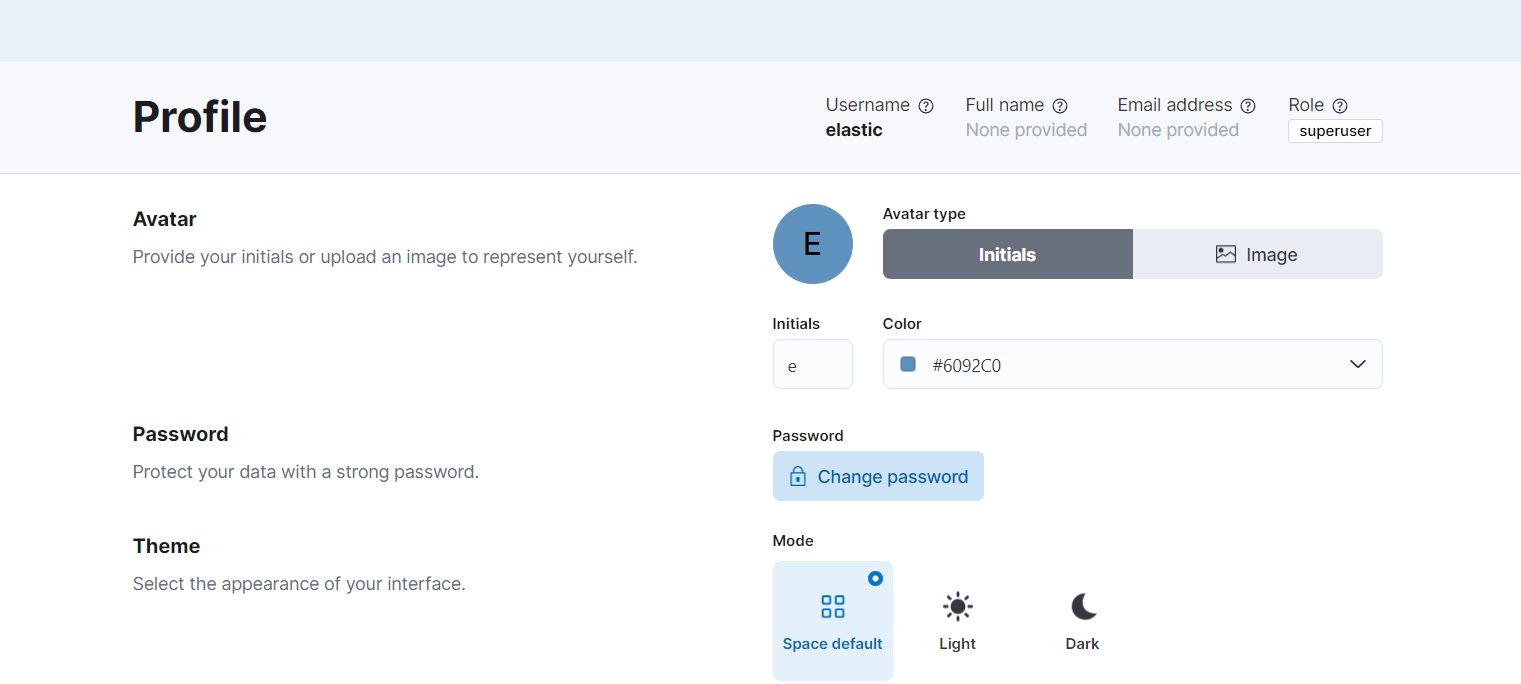
키바나에서 정상 접속까지 확인됐다면, 해당 페이지에서 패스워드를 변경해줄 수 있습니다.
reference
'🛠️TOOL > 🔭Elasticsearch' 카테고리의 다른 글
| [Elasticsearch] - 엘라스틱 서치의 색인 With 분석기 (1) | 2024.04.01 |
|---|---|
| [ELK] - 엘라스틱 서치 기본 개념 & 용어 (0) | 2024.04.01 |
| [ELK] - 엘라스틱 서치란? (2) | 2024.03.27 |
| [Elasticsearch] - Elasticsearch의 각 노드 별 적정 메모리 할당 (0) | 2024.03.27 |
| [ELK] - Elasticsearch & Kibana 8.12.2 설치 (with docker,WSL2) (0) | 2024.03.25 |